Showing posts with label Candy. Show all posts

Monday, October 22, 2012

Old Fashioned Dots

Picture by Living
I love Halloween!  I love having the little kids come knock at my door and trick o treat.  I love to see their costumes, and their faces as they dig through my bowl for candy.  It is one of my most favorite nights of the year.  I like to have something extra special for my treater's that I know personally.  This is one of my go-to recipes for the special little kids that I love and adore. This treat was one of my favorite's growing up, and it never seems to fail to be my little kids favorite too!


Ingredients
1lb. Powdered Sugar
5 Tbs. Meringue Powder
1/2 cup Water
Yellow and Red Food Coloring, for Halloween colors. You can use any that you like though.

Directions
Line a baking sheet with 10x13 inch freezer paper strips.  I like to tape mine onto the baking sheet so they don't slip.

Beat together sugar, meringue powder, and water, with a mixer.  (Test a little bit with a toothpick on the freezer paper to make sure that the icing forms a domed dot, and doesn't spread.  If it forms a peak it's too thick and you need to add a tiny bit more water 1/2 tsp. at a time.  If it's too runny you need to ass more sugar 1 tsp. at a time.)

Divide icing into 3 bowls.  Mix your red and yellow to get orange, then do one yellow, and one white. (Like I said in the ingredients though, you can do any colors you like.)
Put the icing into piping bags and squeeze into the corner (I just use Ziploc baggies and cut off the corner of one side).

Pipe dots 3 to a line onto your freezer paper.  (I normally draw straight lines horizontally all the way down the freezer paper so I know how to line up the dots.  Then I just erase after the dots have dried. You can also find templates for this online.)  Alternate the colors all the way down so you have equal Yellow, Orange, and White.  (I like to make mine look like the candy corn).

Let stand uncovered until the dots are firm and hard.  It normally will take anywhere from 24-48 hours, so do this in advance before Halloween.  Then pop off and enjoy!!

Wednesday, September 26, 2012

Homemade Fruit Roll-Ups

I saw this recipe on pinterest from loveyoumadly.com. I was so excited about it, that I had to share it on my page! I tried it, and it's amazing! This girl is brilliant, and I'm so glad she shared. Here you go...


100% Real Fruit Roll-Ups

This recipe is pretty flexible. You have the freedom to pick one fruit or mix different kinds. You can use fresh, frozen and dried fruit. Below the recipe are some fruit combination suggestions, but feel free to try out your own combos too. I suggest making a few different trays of fruit at the same time because these won’t last long in your house and though they are VERY simple to make, they do take a long time to set.

1. Warm the fruit in a pot on the stove and mix it into a puree. If there are seeds in the puree you can pour it into a sieve to get the seeds out (I didn’t).
2. Spread the puree on a oil-sprayed silpat baking mat (my baking love!) or parchment paper (BE SURE to spray! If you don’t it will stick!). 1 1/2 cup of fruit puree is enough for 1 baking sheet, and put in the oven on 140°F (or as low as your oven can go. my stove’s lowest temperature is 170). Leave the oven door open a little bit to let the moisture out.
3. They are done when the puree isn’t sticky anymore, you normally need between 5-8 hours depending on the oven and your fruit choices. (If you live in a warm climate, you can just leave the pan in the sun for the day).
4. Use a sharp knife or pizza cutter to cut them and roll them with wax or parchment paper when they are still warm. Enjoy this healthy alternative.

Fruit combination ideas:
Yellow: 1 fresh mango, 200 g dried apricots, 1 orange (the juice) (these came out the best in my opinion!)
Purple: Frozen raspberries, frozen blackberries and 1 banana (these were very seedy, you could replace the raspberries with blueberries)
Green: Kiwi, mango and mint leaves
Blue: Blueberries and grape juice
Red: Strawberries and banana
You can also add spices such as cinnamon, cardamom, vanilla pods or mint leaves.

Monday, February 20, 2012

Golden Graham, Coconut, Chocolate Treat

These are devilishly addicting.  I made them for my husband one day when I was creating treats with what I had in the pantry and he fell in love, okay okay, I did too.  I think we ate the entire thing during one movie!  It really is that good!

Ingredients
1/3 cup Butter (YOU HAVE TO USE BUTTER!)
1 (10oz) bag Marshmallow Minis
1 box Golden Grahams
1 cup Milk Chocolate Chips
1 cup Shredded sweetened Coconut

Directions
In a big bowl pour in your cereal, chocolate chips, and coconut.  Set aside.

In a sauce pan over medium heat melt the butter, add the marshmallows and melt until it is a sauce.  Remove from heat and pour over the cereal and coconut mix.

Mix slowly and thoroughly so every piece of cereal is kissed with the delicious butter mixture.  The chocolate chips will start to melt from the heat and everything is going to blend so well.  When everything is well combined, pour out onto a baking sheet and cool in your refrigerator.

You other option is doing what I do, eat it hot right out of the bowl.  Either way you're going to love this dessert!

 P.S. for an added bonus at the end of mixing everything when it has cooled off a little bit I'll throw in some more mini marshmallows so you get some whole ones in there.  :)

Monday, January 30, 2012

Valentine's 2012

I have my girlfriends, sister, nieces, and mom that I do Valentine's day gifts for and this year I'm into mason jar gifts.  I wanted to show you what I'm doing to give you an idea and start getting those creative juices going.  the first

1. Cookies in a Mason Jar
Bake up your favorite cookie and then in the short and fat mason jars fill up with a couple and they decorate.  Get a white and re fabric and hot glue to the top, and add a bunch of red, pink, and white ribbon, and had a little tag from you.  Here's my example.
So easy and so fun!  I promise your friend will love it.  Another idea if you don't want to back.  Get a pair of V-Day socks, some chapstick, yummy lotion, and some peppermint oil maybe a puma stone and that makes a great gift!  Anything in a mason chair this year is big and you can make it look soo cute!


2.  Cake in a Mason Jar
Make your favorite cake, add a little in once it's cooked, add a little frosting, and then add more cake.  Close it up and add your cute note and ribbons.


My last Valentine's idea is
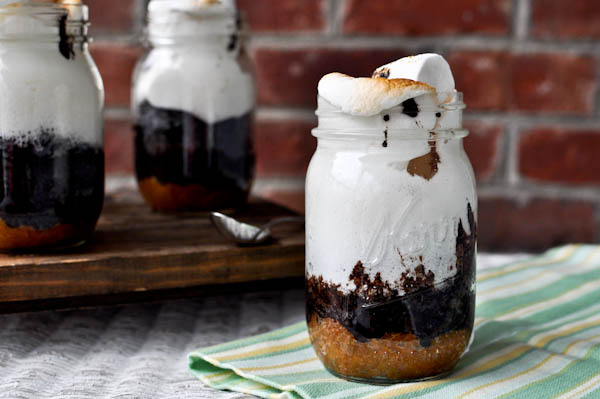
3. Smores in a Mason jar from a darling little site I cam across 
http://www.howsweeteats.com/2011/04/smores-cake-in-a-jar/
S’mores Cake in a Jar
makes 4 16-ounce mason jar cakes
for crust:
1 1/2 cups graham cracker crumbs
1/2 stick butter
pinch of salt
Preheat oven to 350 degrees.
Melt butter and mix in graham crumbs and salt. Mix until moistened. Spray 4 mason jars with non-stick spray and press graham crust into jars. I began by adding a tablespoon to each, and repeating until graham crumbs were gone. They don’t need to look perfect. I pressed the crumbs down firmly with the flat bottom of a clean screwdriver.

1 1/8 cups all purpose flour
1/4 cup dark cocoa powder
1 1/4 teaspoon baking soda
1/2 teaspoon salt
3/4 cup brown sugar
1 egg
1 teaspoon vanilla extract
1/2 cup milk
1/2 cup + 1 tablespoon heavy cream
1/2 cup butter, melted
2 tablespoons sour cream
for topping:
1 bag of large marshmallows
In a bowl, whisk egg and sugar until smooth and no lumps remain. Add milk, cream, butter and vanilla, and mix until combined. Stir in sour cream. Sift dry ingredients together and add to wet mixture. Mix until batter is smooth. Using a 1/4 cup measure, add batter to mason jars one scoop at a time. You only want to fill them up about half way, and the batter should work evenly for 4 jars. Again – don’t worry if it is perfect. Place mason jars in a baking dish and add about 1 1/2 cups of water to the bottom. Bake for 30 minutes, or until cake is set.
Remove cake from the oven and press large marshmallows down on top, being careful not to burn yourself. There is no set number of marshmallows to use, I pressed down as many as I could, about 4-5 each. Heat the broiler on your oven and watching carefully, brown marshmallows for about 1-2 minutes, or until golden brown. Do not take your eyes off them! Serve immediately.

So there you do everyone!  This Valentine's you decorate that Mason Jar, and add something yummy, and all those girls in your life, and hubby/boy is going to love it too!  Here are so fun ideas.  Happy Valentine's Day!

Monday, December 5, 2011

Homemade Caramels

I grew up with a Dad who made caramels every weekend from Halloween to Christmas.  He made them with nuts, with chocolate, with fruit, with sea salt (my personal favorite), with just about everything, and I give him props because they were always delicious!  I have never tried to make them because candy intimidates me to no end, but that all ended today.  I told myself that it's Christmas, and having to be a bit more frugal this year I needed gifts for my neighbors, so the caramel experiment was born.  
 I am pleased to say that it turned out great!  Not only are the caramels delicious, they are just as good as my dear old Dad's.  I was thrilled with the outcome! 

I have to be honest though, I didn't get it on the first try.  I made them, but didn't let them boil for long enough so after they had set up, I pulled them out of the 9x13 baking dish, and put them back in the pan and boiled them for another 5 minutes.  So if you make them and they're not done enough (if they're too sticky and still falling apart) just know that you can always reheat them and boil them again.  Just remember that with candy you need to use a wooden spoon and you need to stir it constantly.  I also didn't use a candy thermometer, but I'm sure that would have helped my problem.  I just don't have one, so I did without.  I mean come on, my Dad never used one.  ;)  If you are going to use one though my Dad said that you want the temp. to be 244 degrees.  Okay, on to the recipe!

Ingredients
1 can Sweet and Condensed Milk (the good stuff, eagle brand)
1 (or 2) tsp. Vanilla (I really like my Mexican vanilla so I use 2)
2 1/4 cups Brown Sugar
1 cup Light Corn Syrup
1 cup Butter

Directions
 In a pan melt the butter.  Then over medium heat combine all the ingredients except for the vanilla.  Stir constantly with a wooden spoon until it comes to a rolling boil.  Once it starts to boil the caramel will change color.  It will get a light brown.  Let it boil for about 6-7 minutes.  After about 6 minutes get a cup of cold water and drizzle a little caramel into it.  Let it cool for a few seconds and then see if you can roll it into a small ball with your fingers.  If it still falls through your fingers it's not done.  If you can make it into a soft ball your caramel is finished or if it reaches 244 degrees. 

Remove from heat and stir in the vanilla.  Line a baking dish with parchment paper and pour the caramel into the baking dish.  Let set up either on the counter or the refrigerator until hard.  Then to cut into little pieces I take the entire thing out holding the parchment paper and then cut with a pizza cutter to get exact pieces. 
For your neighbor gifts, cut little squares and then roll them up in the parchment paper and twist on the ends.  Place in a a cellophane bag, tin, a cute Christmas bag, and tie with your little Christmas card.  Your neighbors will love it!  I've put a few of my favorite ideas on here.  Merry Christmas!