Showing posts with label Chocolate. Show all posts

Wednesday, February 6, 2013

Chocolate-Almond-Coconut Milk

Coconut water is HUGE right now, and rightfully so.  It's extremely healthy, and has a lot of good nutrients, but I'm sorry, it's disgusting.  I needed something with a lot of potassium and electrolytes, and I came across this beautiful product...Sambazon Protein Chocolate-Almond-Coconut Milk.  It's nutritious AND Delicious!  My only problem was shelling out $3 a day for it when I'm drinking 2 of them a day.  

As I was walking down the aisle in Whole Foods to go pick some up, I walked passed CANNED coconut milk.  Well this got me thinking (which is something I really try not to do) and I figured, why not make my own?  I mean I have an amazing blender that will blend anything, and this canned coconut milk is only $1 a can, so I'm going to do it. 

I went and bought one of the bottles so I could see the ingredients on the back.  I figured that the only important things to have to make this was dutch process cocoa, powdered sugar, almonds, vanilla soymilk, vanilla extract, and coconut milk.  Turns out I was right.  So instead of spending a ton of money stocking up on these delicious bottles for the week, I stocked up on the ingredients to make it. 

As I checked out with my ingredients I realized that I had spent about $20 on everything, and I bought 6 cans of coconut milk so I would have it on hand.  I knew I better make this work or I just wasted money on what could have gone to the real deal.

I got home, pulled down the Blendtec to see if my Chocolate-Almond-Coconut Milk really would blend.  (I know, my sarcasm is hysterical.)  After I experimented a bit and tasted the final product I was VERY happy.  It literally tasted the exact same, and I only used 1 1/2 cans of coconut milk for 2 quarts of the finished product.  So my friends, I am here to share the wealth with all of you!  Enjoy!

Ingredients
1 14.5 oz can Coconut Milk
1/2 of another 14.5oz can of Coconut Milk (I put the remainder in ice cube trays, froze them and saved them for next time)
1 1/2 Tbs. Dutch Process Cocoa
1/2-2/3 C. Powdered Sugar
1-1 1/2 C. Vanilla Silk Soymilk
1/2 C. Raw Almonds
2 tsp. Pure Vanilla Extract
6 ice cubes (just to make it cold. this is optional)

Directions
In your Blender, blend up the coconut milk, almonds, and soymilk. Blend until the almonds have broken down. Then add remaining ingredients and blend until it's the consistency you want. 

If you want it runnier add more soymilk. If you want it thicker add more almonds.  If you want it sweeter more powdered sugar. Creamier? more coconut Milk....you get the idea.

Then I just pulled out some hand dandy mason jars, spaghetti jars, any jars, filled them up, and put them in the fridge to drink.  This recipe made 2 Quarts.

The best part is the little almond bits you get in every sip.  Put it on ice and drink it straight out of the jar. I hope you like it!!

Tuesday, January 29, 2013

Best Brownies

As I was baking my brownies today, I realized that I had never share my recipe on the blog.  WHAT?!  How could I have done this?  I mean everyone needs to know how to make brownies.  It should be a law.  So today I am going to share my favorite and most delicious brownie of all time recipe (at least in my opinion).
Ingredients
2 Sticks of Butter
1/3 C. Cocoa
2 C. Flour
2 C. Sugar
4 Eggs
4 tsp. Vanilla

Directions
Preheat oven to 350 degrees.
Over medium heat, melt the butter and cocoa until smooth.  Pour into a mixer and add the eggs, vanilla, and sugar.  Mix until creamy, and add the flour.  Mix until well incorporated, and do not over stir.

Line a 9x13 baking dish with parchment paper and pour the batter into the dish.  Bake for 20-25 minutes until a toothpick comes out clean.

Let cool for 10 minutes and then frost.

Frosting Recipe
Ingredients
1 cube butter
1/3-1/4 C. milk
3-3 1/2 C. Powdered Sugar
1 tsp. Vanilla
1/4 C. Cocoa
Pinch of Sea Salt

Mix all together until it's the consistency that you would like.  (If you want it more runny add 3 C. Powdered Sugar, for firming add 3 1/2 C.)

Pour over warmed brownies and let harden just a bit.

I serve with Vanilla Ice Cream.  Enjoy!!

Friday, May 11, 2012

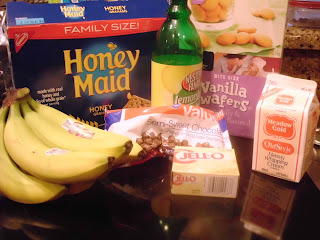
Banana Cream Pie in a Jar

 I was experimenting in the kitchen yesterday because well, that's what I do for fun at my house.  lol  I came up with an idea and to see if it worked I gave it to a friend for her Mother's day gift.  Well, not only did she and her children love it, but she declared it "Meth-in-a-Jar".  So I guess the stuff is pretty addicting  ;)  In all seriousness though, it's so easy, so delicious, and makes the most amazingly fluffy and nummy dessert it the world.  Shove it all in a pint mason jar and you can take it anywhere!  Have I convinced you enough to try it?  If not here's a picture of someone who was eating it....
Licked it Clean!

So now have I convinced you that you must try this RIGHT NOW?!  Well, okay.  Then I guess you'll need the recipe....


Ingredients
3-6 bananas
2 small boxes of instant Vanilla pudding
4 cups of milk
1 cube of butter
1 plastic package of Graham crackers (just one of the pre packaged ones you get out of the actual box)
15 Vanilla Wafers
1 pint Heavy Whipping Cream
1 bag semi sweet chocolate chips
1 handful of shredded sweetened coconut
3-6 spoonfuls Powdered sugar
5 pint size mason jars
2 Tbs. Lemon Juice

Directions
In a mixing bowl whisk your 2 boxes of pudding with all of your milk and then put in the fridge.
In a mixing bowl smash up your vanilla wafers, and graham crackers until really fine.  (I used a potato masher, but you can also use your food processor)
Throw in your handful of coconut and toss with your hands until it's well mixed.
Pour in you butter and mix together until everything is coated and when you pinch it, it sticks together.
Put a handful of the cracker mixture into the bottom of each mason jar and press down firmly with your hand.  Set aside.

With a double boiler (or a bowl over a pot of boiling water) melt your chocolate chips.  I used about 3/4 of the bag. 

When your chocolate is melted drizzle on top of the graham cracker crust until it's covered.  Then put those in the fridge to harden.
With an electric mixer whip 1 cup of your Heavy cream until stiff peaks form.  Add in 2 Tbs. powdered sugar.  Set the rest of the cream back in the fridge (you will use it later)

Pull your pudding out of the fridge because at this point it will be set.  Slowly fold in your whipped cream into the pudding until well combined.  Put back in the fridge.

When your chocolate has hardened, pull out your mason jars, pudding, and bananas.  Cut your bananas into slices and very lightly brush them with lemon juice (helps them to not turn brown).

On top of the chocolate in your mason jar put 1/2 of a cut up banana in.  Then put a massive scoop of the pudding mixture and then the other 1/2 of the banana slices.  This is how you layer it.  So, it goes 1. crust 2. chocolate 3. banana slices 4. pudding 5. banana slices and 6th will be more whipped cream.

After you have them filled put back in the fridge and whip the remaining cream.  Add 3-4 Tbs. powdered sugar and then put a dollup of whipped cream on top of each mason jar treat.  Put your lid on and it's finished.

Now as you can see, I had leftovers so I made 6 mini cupcake size of these too.  How you do that is 1.crust 2. chocolate 3. 1 banana slice 4. pudding 5. top with a banana slice.  No matter what you do or how you layer, you're going to LOVE this treat!  Happy Mother's Day!

Thursday, April 26, 2012

Black Bottom Banana Cream Pie

In honor of my husband's 30th Birthday today, I am going to post my pie recipe that I make for him every year.  You see, my darling husband hates cake so therefore he gets his favorite pie every year.  Now I don't normally give out this secret recipe because it's so easy that I think people would think "She's doesn't know how to bake, that's just putting stuff together."  But once you taste it, I promise you won't fault me for making it easy.  Like I've always said, I want cooking to be fast, affordable, and delicious, so here you go.  My famous Black Bottom Banana Cream Pie....

Ingredients
2 graham cracker crusts (bought or homemade)
1 4-serving packet of instant Vanilla Pudding
1 14oz. can sweet and condensed milk
1 pint Heavy whipping cream
1 cup cold water
6 oz. Milk or Semi sweet chocolate (I use chips) chopped
 1/2-1 cup heavy cream
4-6 bananas
1/4-1/3 cup Powdered sugar

Directions
Preheat oven to 350 degrees

Put your graham cracker crusts in the oven with a little butter brushed on and let sit for about 5-7 min. just to harden the crust.  Take out and set aside.
Chop your chocolate chips roughly.  In a double boiler melt chocolate slowly.  When chocolate is melted slowly pour in your 1/2-1 cup cream.  You are wanting the consistency of a ganache.

When the chocolate is runny pour 1/2 of the chocolate into the bottom of one crust and the other 1/2 into the bottom of the other crust.

Cut bananas into small slices and layer on top of the chocolate.  Pack them in there good if you like a lot of bananas.

In a mixing bowl mix vanilla pudding, water, and sweet and condensed milk.  Put in the refrigerator while you do this next step.

Take 1 cup of your pint of heavy cream and beat it until peaks begin to form.  

Take your pudding mixture out of the fridge, and slowly fold in the whipped cream with a rubber spatula.  Put the pudding filling 1/2 in one crust and 1/2 in the other, right on top of the bananas.

Take the rest of the pint of cream that you have left over and beat it until peaks form and slowly add your powdered sugar in large spoonfuls until it gets to the sweetness you want.  I normally use about 1/4 to 1/3 cup but you want to add 1 spoonful at a time so you don't make it too sweet.

Once the sweet whipping cream is done, spread on top of the pudding mixture.  I normally grate a few slivers of chocolate and put that on top of the cream to finish the pie.  Then refrigerate your pie for at least 3 hours before serving.  You want your chocolate to be firm.  Then cut and enjoy!!


Wednesday, March 21, 2012

Marshmallow Brownies

So I had to share a recipe that I found on pinterest and just about died over because they look amazing, and after making them and tasting them tonight I can say that they truly are to die for!  So here's the recipe...

Ingredients
1 c. margarine
2 c. sugar
1/3 c. cocoa
4 eggs
1 1/2 c. flour
1 tsp. salt
2 tsp. vanilla

Directions
Soften margarine and blend in 2 cups sugar and cocoa.  Beat together and add 4 eggs, one at a time.  Add flour, salt and vanilla.

Spread on large (10x15x1 inch) greased cookie sheet.  Bake 25 minutes at 350.  Remove from oven and cover entire top with 1 package of miniature marshmallows.  Return to oven for 3 minutes, until soft and puffy.  Cool and frost with chocolate frosting.

Chocolate Frosting:
1 stick margarine (1/2 c.), softened
1/4 cup milk
1-2 tsp vanilla (depending on your taste)
3 cereal spoonfuls of cocoa
2-3 cups of powdered sugar
Mix all ingredients with a hand mixer until smooth.  Add more powdered sugar or milk until you reach desired consistency and spread on top of bars.

Monday, February 20, 2012

Golden Graham, Coconut, Chocolate Treat

These are devilishly addicting.  I made them for my husband one day when I was creating treats with what I had in the pantry and he fell in love, okay okay, I did too.  I think we ate the entire thing during one movie!  It really is that good!

Ingredients
1/3 cup Butter (YOU HAVE TO USE BUTTER!)
1 (10oz) bag Marshmallow Minis
1 box Golden Grahams
1 cup Milk Chocolate Chips
1 cup Shredded sweetened Coconut

Directions
In a big bowl pour in your cereal, chocolate chips, and coconut.  Set aside.

In a sauce pan over medium heat melt the butter, add the marshmallows and melt until it is a sauce.  Remove from heat and pour over the cereal and coconut mix.

Mix slowly and thoroughly so every piece of cereal is kissed with the delicious butter mixture.  The chocolate chips will start to melt from the heat and everything is going to blend so well.  When everything is well combined, pour out onto a baking sheet and cool in your refrigerator.

You other option is doing what I do, eat it hot right out of the bowl.  Either way you're going to love this dessert!

 P.S. for an added bonus at the end of mixing everything when it has cooled off a little bit I'll throw in some more mini marshmallows so you get some whole ones in there.  :)

Tuesday, October 4, 2011

Peanut Butter and Honey Granola Bars

I'm so sorry to all my followers!!  I haven't posted for awhile because I was out of town on a speaking engagement down in Las Vegas.  Then I came home and got sick.  No fun, but I'm back and I have an amazingly delicious treat that I just learned how to make.

I really love anything with honey, and when I use honey I always use Cox honey.  I really like local, fresh, and raw honey, but you can use whatever you would like.  

These bars are delicious, nutritious, and very filling.  I like to pack them in my husbands lunch for school.  It helps him stay full throughout his long days at school.  Anything I can do to keep his brain working is a good thing, so try it for your kids as they head out the door to school.  It's the perfect snack in between breakfast and lunch or lunch and dinner.  Here's the recipe...

With Chocolate Chips
 Ingredients
1 egg white
1/2 cup honey
1/2 cup chunky peanut butter (you can use raw, but I use Jif)
1/4 tsp. Cinnamon (optional, but I feel like it gives this treat a really yummy fall taste)
3 cups Old Fashioned Oats (don't use instant or steel cut)
1 stick melted REAL butter (you know me, and everything is made with real butter.  If you need a substitute though you can use your favorite kind of oil)
1/2 cup golden raisins (you can also use dried cranberries instead which is a good little addition if you're not a fan of raisins, but I love the golden.  If you want a sweeter version you can also add chocolate chips here too.  I'll add a picture of both kinds on this post)


Directions
Line a 9x13 baking pan with parchment paper, so that the parchment paper extends over the edges of the pan. Set rack in the oven to the middle position. Preheat oven to 350°F.

With a mixer, beat the egg white until frothy. Beat in the honey. Beat in the peanut butter. Add the oats. Sprinkle on the cinnamon. Pour the melted butter over everything and stir until well combined. Stir in the raisins.
With Golden Raisins

Spread the mixture over the bottom of the parchment paper-lined baking dish in an even layer.


Place in oven and bake for 25 minutes, until nicely browned on top. Remove from oven and let cool for 5 minutes. Remove the baked granola from the pan by lifting the edges of the parchment, and place on a cutting board. Use a long sharp knife to cut into 12 to 16 bars.

Let cool completely before eating.

Tuesday, September 20, 2011

Sunday Boston Cream Pie

This is one of my favorite recipes of my Mom's.  As children we would get this every year on my Dad's birthday because it was his favorite.  Well now I have started making it on Sunday for my Husband because he loves it so much.  (He probably wishes I wouldn't make it so he wouldn't have to run those extra miles every night to keep it from staying on his cute little body.)  It really is so delicious, so easy, and nothing like what you're thinking!  I can't wait for you to try this and fall in love like we have! (Oh and the picture will be coming.  I just have to take come this Sunday when I make it.)

 Ingredients
For the Crust
1 Cup Flour
1 cube Butter

For the Filling
1 small pkg. Instant Vanilla Pudding
8 oz. Cream Cheese
1 8oz. carton Cool Whip divided
1 cup Powdered Sugar
2 small pkgs. Instant Chocolate pudding
3 cups Milk

Directions
For the Crust
Mix ingredients with hands and press into a 9x13 greased baking dish.  You want it to be as thin as possible.  Bake at 350 degrees for 15 minutes.  Let cool completely.  While cooling make your pie filling.

For the Filling
Mix 1 small pkg. instant vanilla pudding according to it's pkg. instructions.  Add it to 8oz. softened cream cheese, 1 cup Cool Whip, and 1 cup powdered Sugar.  Spread this mixture over cooled crust.

Mix 2 small pkgs. instant chocolate pudding with 3 cups milk, until thick.  Then spread that on top of the vanilla layer.  Spread the remaining Cool Whip on top of the chocolate and sprinkle on crushed nuts of your choice or chocolate shavings  :)

Saturday, August 27, 2011

Cowboy Cookies


I absolutely love Cowboy cookies.  This is coming from a girl that isn't a big cookie eater.  Like I have said before, I can bake one killer cookie, but I've never been big on eating them.  Not with these sweet treats!  I'll suck Cowboy cookies down.  They are a mix of just about everything in your pantry, they have a bite to them, they are chewy, and in my mind they are just the perfect cookie.  If you're looking for that one true perfect cookie to dip into you tall glass of ice cold milk, this is it my friends.  Welcome to the Country....

Ingredients
2 cups all-purpose flour
1 teaspoon baking soda
1 tsp. salt
1/2 tsp. baking powder
1 cup (2 sticks) unsalted butter, softened
3/4 cup sugar
3/4 cup packed light-brown sugar
2 large eggs
1 tsp. vanilla extract
1 1/2 cups old-fashioned oats (not instant or quick-cooking)
1/2 cup Milk Chocolate Chips
1/2 cup White Chocolate Chips
3/4 cup walnuts (optional)
1/2 cup shredded unsweetened coconut
Vegetable-oil cooking spray

Directions
Preheat oven to 350 degrees.

Into a bowl, sift together flour, baking soda, salt, and baking powder.

With an electric mixer on medium-high speed, cream butter and both sugars until pale and fluffy. Reduce speed to medium. Add eggs, one at a time, beating well after each addition. Beat in vanilla.With mixer on low speed, gradually add flour mixture, beating until just incorporated. Beat in oats, chocolate, walnuts, and coconut until just combined.

Coat baking sheets with cooking spray; line with parchment, and spray parchment. Using a 1 1/2-inch ice-cream scoop or a tablespoon, drop dough onto prepared sheets, about 3 inches apart.

Bake, rotating sheets halfway through, until edges of cookies begin to brown, 16 to 18 minutes. Transfer sheets to wire racks to cool 5 minutes. Transfer cookies to racks to cool completely. Cookies can be stored up to 3 days at room temperature in airtight containers

Wednesday, August 24, 2011

Mom's Chocolate Cobbler

Wow oh wow is all I can say about this recipe.  I wish I could say that I made it, but I didn't.  My mother gave it to me, and it is amazing!  It is simple, easy, delectable, and delicious!  You are going to find yourself making this really late on a Saturday night when all the ice cream stores have closed and you have a chocolate craving, or just any regular day of the week is good too.  ;)  The best part about this is that you don't need hot fudge sauce to go over, because the sauce is already baked in!

Ingredients
1 cup flour
2 tsp. Baking Powder
1/4 tsp. Salt
7 Tbs. Cocoa Powder, Divided
1 1/4 cup Sugar, divided
1/3 cup melted Butter
1 1/2 tsp. Vanilla Extract
1/2 cup Light Brown Sugar, packed
1 1/2 cup HOT tap water or milk

Directions
Preheat oven to 350 degrees.

First stir together the flour, baking powder, salt, 3 tablespoons of the cocoa, and 3/4 cup of the white sugar. Reserve the remaining cocoa and sugar.

Stir in the milk, melted butter, and vanilla to the flour mixture. Mix until smooth.
Pour the mixture into an ungreased 8-inch baking dish. I prefer my small oval Corning Ware glass dish.

In a separate small bowl, mix the remaining white sugar (it should be 1/2 cup), the brown sugar, and remaining 4 tablespoons of cocoa. Sprinkle this mixture evenly over the batter.
Pour the hot tap water over all. DO NOT STIR!

 Bake for about 40 minutes or until the center is set.
Let stand for a few minutes if you can hold yourself back. Serve with my homemade vanilla ice cream using the gooey sauce to spoon over all.

Thursday, August 11, 2011

Chocolate Peanut Butter Surprise Cookies

 I have a cute little hubby that LOVES peanut butter.  Every day when he leaves for school, he leaves with a homemade lunch from me.  That lunch always includes some concoction of a peanut butter sandwich.  I swear he could eat them for breakfast, lunch, and dinner.  He just loves the stuff.  I love these cookies because they are made with the real peanut butter in the center and not a reese's cup like a lot of melty cookies that I find.  I got so sick of people wrapping the dough around a PB cup that I had to come up with one that I knew I would eat.  So after a few tries I got it, and the rest is history.

Ingredients
1 1/2 cups flour
1/2 cup unsweetened cocoa
1/2 tsp. baking soda
1/4 tsp. salt
1/2 cup sugar (plus more for dipping)
1/2 cup firmly packed brown sugar
1/2 cup unsalted butter (softened)
1 cup JIF creamy peanut butter (divided)
1 tsp. vanilla extract
1 large egg
3/4 cups powdered sugar

Directions
Preheat the oven to 375 degrees.
Combine the 1st 4 ingredients in a bowl with a whisk, and set aside.
In your mixer, combine sugars, butter, 1/4 cup peanut butter, and vanilla until fluffy.  Add the eggs until fluffy and light and then add the dry ingredients.  Mix well.  Set your dough aside.
Stir together remaining 3/4 cup peanut butter and powdered sugar until smooth. Roll into 1-inch balls.
 Break off 1 tbs ball of dough. Make an indentation and press peanut butter inside. Cover with another 1 tbs ball of dough and press together.
 Dip the cookie in sugar.
 
Place cookies on a lightly greased cookie sheet. Use the bottom of a drinking glass to make cookies flatter .

Bake cookies at 375 degrees for 9-10 minutes or until set.

White Chocolate, Butterscotch Heaven

I am going to pat myself on the back right now because I really am an excellent cookie maker.  I don't know if many of you have tried the famous "Buffo's Chocolate Chip Cookies" that I came up with, but they are good.  They are so good that a cookie company in Salt Lake City featured them on their menu as cookie of the day.  I also think I'm pretty good because I'm not a big cookie eater.  I became so good at making cookies because every person around me loves cookies.  They're easy to make and delicious according to my family and friends, so I just keep coming up with more and more cookie recipes.  This recipe is my husband's favorite by far.  He doesn't really enjoy milk chocolate, but he loves white chocolate, so this cookie is for him.

Ingredients
1 cup sugar
1 cup firmly packed Brown sugar
1/2 cup butter softened
1/2 cup shortening
2 eggs
1 tsp. baking powder
1 tsp. baking soda
1 tsp. salt
1 1/2 tsp. vanilla
1/2 tsp. almond extract
3 cups flour
1/2 bag butterscotch chips
1/2 bag white chocolate chips
(Sometimes for an extra treat I will add 1/2 cup of shredded coconut to the recipe which just makes it even more heavenly.  It's totally optional though.)

Directions
Pre-heat oven to 350 degrees.
In a mixer combine together sugars, butter, shortening, and vanilla until creamy.
Add eggs and almond extract and beat until fluffy.
Add all the dry ingredients, and mix until the dough is tacky, but doesn't stick to your fingers.  You want it semi sticky but not so much that it doesn't stay together or form a ball without coming off your fingers.  (If it is too sticky add a little more flour a spoonful at a time until you get it to the tacky stage.)
Add the chips and mix on low until well combined.

On a cookie sheet lay down pastry paper and lightly spray with Pam, or grease a cookie sheet.  To make the balls for the cookies, I just get a spoon and scoop a little bit up and make a ball about 1 inch high and 1 1/2 inches wide.  If you want your cookies to look perfectly round and pretty use a cookie scoop.  I like mine to look like just scoops of dough with rough edges and what not, but you do what you want.  Place about 2 inches a part on your cookie sheet and bake for 8 minutes or until they are just slightly turning golden on top.

Sunday, July 3, 2011

Nutella Brownies

The Nutella cupcakes were such a huge hit, that I decided to do another nutella recipe.  Everyone loves brownies so why not throw Nutella in them and make them spectacular?!

Ingredients for Brownie Batter
1 cup butter, unsalted
2 cups granulated sugar
2 teaspoon Vanilla Extract
4 large eggs
1 cup all-purpose flour
3/4 cup of cocoa powder
1/8 teaspoon kosher salt
1/2 teaspoon baking powder
1 cup Nutella

1/2 cup of semi-sweet chocolate chips


Topping Ingredients (optional)
Nutella
White chcolate chips
Mini semi-sweet chocolate chips


Directions
Preheat the oven to 350 degrees F.
In a medium bowl sift together the flour, cocoa powder, baking powder, and salt.  Then set the bowl aside.
On low heat, melt the butter sticks in a small pot.  Then add the vanilla and sugar while stirring the mixture until well combined. Remove the pot from the heat and let cool.  (I poured the butter/sugar mixture into a medium bowl to cool.)
Once the butter/sugar mixture is completely cooled add the eggs one at a time, making sure to mix each time.
Add the cocoa/flour mixture to the egg mixture gradually, until completely mixed together.
Heat a nutella container in the microwave for a bout 40 seconds.  You want the nutella to have a runny consistency which will allow the nutella to pour easily.  Add the nutella to the batter and mix well.  Lastly add the chocolate chips and fold into the batter.
Pour your batter into a buttered square pan… (I like to parchment paper to my pan before pouring my brownie batter inside.  This makes it easier to take your brownies out after they bake and cool)  Bake for 30 minutes.
Remove from oven and cool completely.  Due to its chocolate amounts the brownie may be sticky and fudgey inside, which to me is the best way to eat them but if they are too fudgey you can stick them in the refrigerator for a little bit.  I left mine in there for a few hours, but you could always leave them in there overnight.
Take the completely cooled brownies out of the fridge and cut in squares.  Then pour a tablespoon of nutella on each brownie square.  Then sprinkle the mini chocolate chips and white chocolate chips on top.  I did not have white chocolate chips but had a white chocolate bar that I just chopped up in small pieces.  Either way it works.  This is completely optional.  I usually just eat mine plain, but the topping looks the best if you are taking them to a part or something fun.  :)

Friday, July 1, 2011

Chocolate Coconut Bars

I am a little obsessed with coconut today, so here is one final recipe before I go to bed.  They are yummy and delicious and melt in your mouth good!


Ingredients
1 1/2 C. graham cracker crumbs
1 2/3 C. sweetened condensed milk
1/2 C. semisweet chocolate chips
1 1/2 C. flaked coconut
1 C. crushed walnuts (optional)


Directions
Preheat oven to 350.  Grease a 9 inch square baking pan.  In a large bowl, mix together the graham cracker crumbs, milk, chocolate, and coconut, until well blended.  Put parchment paper in the bottom of your pan and then spread the mixture into the square pan, distributing evenly. Sprinkle walnuts on top.  Bake for 30min. and let cook before cutting into bars.

You can also drizzle melted chocolate on top if you would like just as a finishing touch.  :)

Saturday, June 4, 2011

Indoor Smore Bar's

I love summer for the outdoor cooking.  My favorite thing about summer though is camping with my family.  We bring the dutchovens, the griddle, tin foil, and always the Marshmallow sticks.  So of course my most favorite food of the summer are Smore's.  I have loved them since I was a little girl and went on my first camping trip to Flaming Gorge. 

I want Smore's all year round though, and living in Utah I don't get to go outside for about 7-8 months of the year, so I had to come up with an "indoor" Smore's recipe.  Here is is for all of you!


Ingredients:
2 Sticks Unsalted Butter Melted
18 Plain Graham Crackers
1/4 C. Sugar
1/2 tsp. Fine Sea Salt (I just use Morton's)
3 Cups Milk Chocolate Chips (and you have to use a GOOD milk chocolate.  My favorite are the 16oz. bag of Ghirardelli milk chocolate chips.  They come in a silver and blue bag, and when they melt they are to die for!)
3 1/2 Cups Mini Marshmallows

Directions:
Preheat the oven to 350 degrees F. 

Line the bottom and sides of a 9 by 13-inch baking pan with foil or parchment paper. You want to leave about 4 inches of overhang on the 2 opposite sides. These are going to serve as your handles to remove the bars from the pan in 1 piece, so make sure that there is enough of the overhang for you to have a solid grip. Grease the foil/parchment well with softened butter. 


In your food processor, grind the graham crackers into a fine meal (you need 2 cups).  Melt your butter in the microwave. In a large bowl, combine your crumbs with the sugar, sea salt and melted butter. The mixture should look and feel like wet sand.

Set aside a heaping 1/2 cup of the crumb mixture for the topping. Evenly press the remaining crumb mixture into the bottom the lined pan. Pop your crust into the oven and bake until it is golden brown, about 12 to 15 minutes. Remove the crust from the oven and allow it to cool.


Melt the milk chocolate in a saucepan over low heat, stirring continuously until fully melted. (I do this a really simple way and I never burn my chocolate because of it.  I don't have a double boiler so I fill a saucepan with water, bring it to a boil, put my chocolate chips in a large glass bowl that is wider then the saucepan and put the glass bowl on top.  I slowly stir until all the chocolate is melted.  It's my "cheap" version of a double boiler) Do not turn up the heat to hurry this process, you must keep it on low.


Pour the melted chocolate over the cooled graham cracker crust. Spread the chocolate evenly over the crust with a butter knife. Sprinkle the marshmallows over the chocolate and press them lightly into the chocolate. Sprinkle the reserved crumb mixture over and in between the marshmallows so that you cannot see the chocolate peaking through the marshmallows.  Refrigerate until the chocolate has hardened a bit.  About 20-25min.

Preheat the Broiler.

Broil the bars 6 inches from the flame until the marshmallows are golden brown, 1 to 2 minutes.


Refrigerate the bars until the chocolate is completely hard, 2 hours or so.


To serve, grab the ends of the liner and lift the bars out of the pan in 1 piece. Move to a cutting board and cut into 24 pieces, or 12, however big you want your Smore.  

Wednesday, May 18, 2011

Texas Sheet Cake

Okay girls who love chocolate, and boys too  ;)  I have a cake that is going to become a staple in your home.  You will find yourself buying buttermilk just so you can make 4 of these cakes.  When your man asks why you bought buttermilk, you can say that you didn't realize it was buttermilk, I guess I'll have to make chocolate cake.  I promise he won't mind. And thanks to my sweet friend Jordyn who introduced me to the Pioneer Woman website.  She is amazing!

Ingredients 
For the Cake:
2 Cups Flour
2 Cups Sugar
1/4 tsp. Salt
4 Heaping Tbs. Cocoa
2 sticks Butter
2 Beaten Eggs
1 tsp. Baking soda
1 Cup Boiling Water
1/2 Cup Butter Milk
1 tsp. Vanilla

For the Frosting:
1 3/4 sticks of Butter
4 Tbs. Cocoa
6 Tbs. Milk
1 tsp. Vanilla
1 lb. (minus a 1/2 cup) Powdered Sugar
(this is not my picture)


Directions:
I use an 18×13 sheet cake pan.

In a mixing bowl, combine flour, sugar, and salt.
In a saucepan, melt butter. Add cocoa. Stir together.
Add boiling water, allow mixture to boil for 30 seconds, then turn off heat. Pour over flour mixture, and stir lightly to cool. 

In a measuring cup, pour the buttermilk and add beaten eggs, baking soda, and vanilla. Stir buttermilk mixture into butter/chocolate mixture. Pour into sheet cake pan and bake at 350-degrees for 20 minutes.

While cake is baking, make the icing. Melt butter in a saucepan. Add cocoa, stir to combine, then turn off heat. Add the milk, vanilla, and powdered sugar. Stir together and pour over warm cake.

Cut into squares, eat, and enjoy every last irresistible bite!!
(this recipe was taken from www.pioneerwoman.com so make sure to check out all her amazing recipes!  The woman blows me away!)

I just wanted to tell you all a direct quote from someone who I gave this cake to yesterday so you can understand how good it is, and that it isn't just me...."That was cake?! Whatever it was I want to die! It is INCREDIBLE! I thought it was a brownie. That stuff is so Freaking Good!"

Saturday, February 26, 2011

Buffo's Chocolate Chip Cookies

The Finished Product!!
I made this recipe when I was in jr high.  I never really had measurements, I just added what I thought it needed until it made the cookie dough I wanted. 
The reason they are called “Buffo's” is because of my neighbor growing up.  He lived next door to me until I got married and moved out of my parents house.  His name was John Buffo.  I would make him a plate of cookies every Sunday and sometimes during the week.  He got a plate and then his daughter and wife got a plate to share.  They are his favorite treat and so I named them after him.  :)

Ingredients
1 C white sugar
1 C packed brown sugar
1 1/3 C Shortening
2 Eggs
2 tsp Vanilla
1 tsp baking soda
1 tsp salt
3 C flour
1 bag Milk Chocolate Chips

Directions:
Heat oven to 375 degrees
In a electric mixer combine all sugars, and shortening until smooth.  Add Vanilla and eggs, mix until smooth.  Add all dry ingredients and mix until dough is formed.  Dough should be slightly sticky but not enough where it won't come off your finger if you touch it.  If it is too sticky just slowly add flour while mixing 1 T at a time, until desired consistency.

Add your favorite kind of chocolate chips.  I just dump them in until I think there is enough.  It's your decision.  If you like a lot in each cookie add a whole bag, if you want less add ¾ bag.  It's really your preference.

Spoon onto greased cookie sheet and cook for 8 min.  Cookies are done when the bottoms are slightly browned.  Place on a cooling rack to cool, but they are the most nummy when they are warm!

Thursday, January 27, 2011

Nutella Marshmallow Cupcakes

So I have become obsessed with Nutella lately. It's creamy, delicious, chocolaty, and makes one moist cupcake! I had a recipe for peanut butter cupcake, and used Nutella instead....AMAZING!! If you try this you have to let me know what you think. The marshmallow frosting was by far my favorite! Here is the recipe....
 Nutella Cupcake

Ingredients:
1/2 cup softened butter or margarine
1/4 cup granulated sugar
1 teaspoon vanilla extract
1 1/2 cups Nutella
4 eggs
1 1/2 cups all-purpose flour
1 teaspoon baking soda

Directions:
Beat the butter until creamy. Add sugar, vanilla extract and Nutella and mix until light. Add the eggs and beat well.

Mix the flour and baking soda. Gradually add to the creamy preparation until well mixed. Half-fill paper cake cups in muffin tins with the mix.

Bake for 15 to 20 minutes at 375 degrees F. Remove from tin and let cool


Marshmallow Frosting

Ingredients:
4 sticks (1 pound) unsalted butter, at room temperature
2 cups confectioners’ sugar
1/2 teaspoon pure vanilla extract
One 16-ounce tub marshmallow cream

Directions:
In a large mixing bowl, beat the butter until creamy.

Beat in one-fourth of the sugar until fluffy, then repeat with the remaining sugar.

Beat in the vanilla, then stir in the marshmallow cream until well blended.